Connect to your Mac
When connecting to your Mac, you have multiple options to choose from. Out of the box, three options are enabled to get you up and running within seconds.
To see your options, please visit the Customer Panel, select your server and click on the
Remote Access tab.

1. Access via KVM Module
OakHost offers its customers access to their Mac minis through a bespoke KVM module, which is attached to each Mac mini. KVM is an abbreviation and means "Keyboard, Video, Mouse". The KVM module therefore is connected to the Mac mini via HDMI and USB, allowing access even during boot, recovery, system freezes and missing network connections.
In order to make onboarding as easy as possible, we allow direct and secure access through the Customer Panel. This will help you get started in no time.
To access your Mac mini via KVM, please sign in to the Customer Panel. Click on
Servers, select the server you want to connect to, select the Remote Access tab and click on Open KVM Screen.
A popup will open giving you direct and encrypted access to your Mac. No client required.
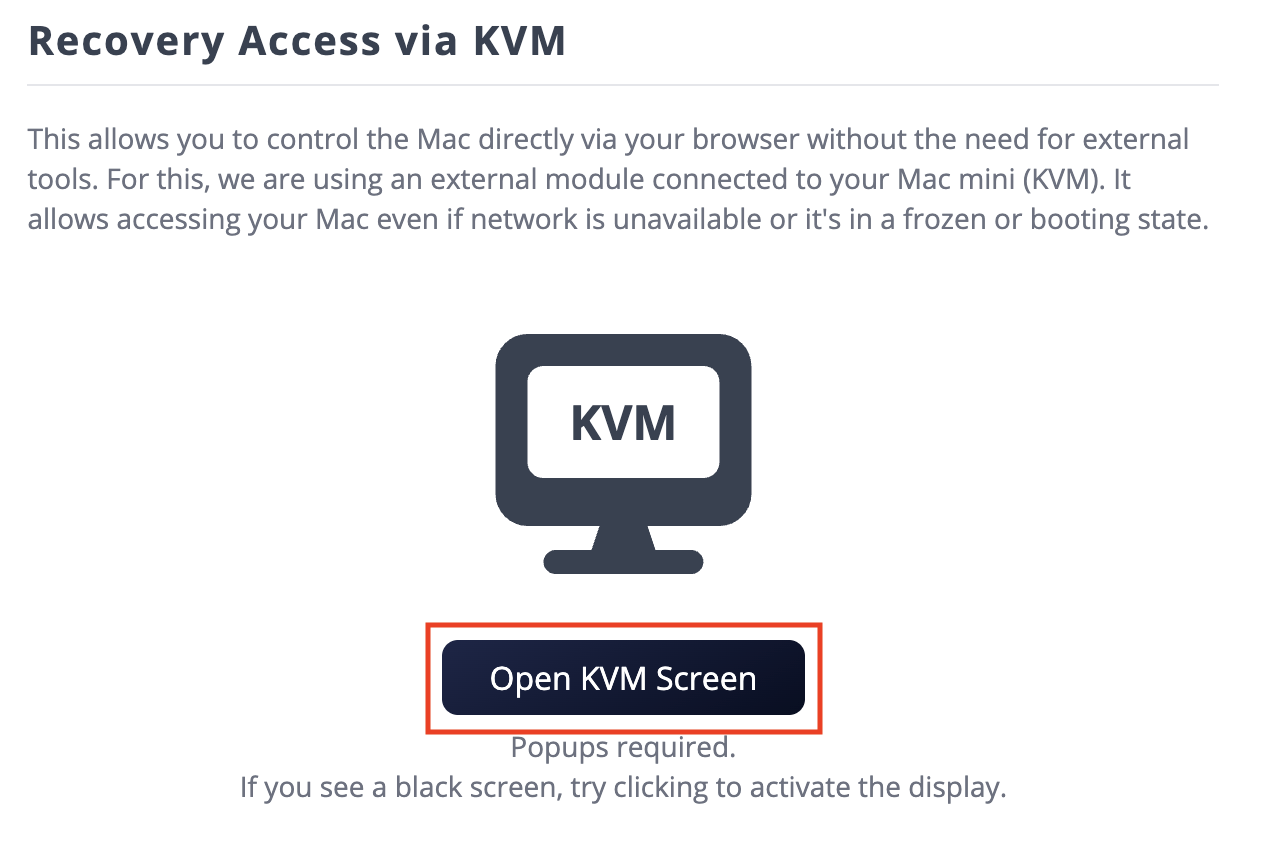
If you see a black screen when connecting via KVM, try clicking somewhere inside the KVM window and pressing a key on your keyboard to activate the screen. If you just powered on the Mac mini, please allow some time for the system to boot.
Depending on your preference, we offer Standard and Dedicated KVM tiers for our product. During daily use, you should not notice any differences between the two types. However, with Standard KVM, it may be possible for the KVM access to be unavailable if too many customers try to access their Standard KVM at the same time. Of course, this does not mean that the Mac mini or access to it will be shared in any way. With Dedicated KVM, your KVM device will always be available regardless of current customer demand.
Since this connection is taking place in the browser, performance and features are limited. For an optimal experience, we recommend you to use other options of connecting to your device. This is however a great way to debug, fix or configure your device in case other options aren't available at the time.
2. Access via Third Party Services
For Mac users, we recommend using Screen Sharing as outlined in Option #3. If you are a Windows or Linux user, we can recommend you to check out the following alternatives.
They all consist of two parts: A client, which is installed on your system and used to connect to the Mac; and a server, which is installed on the Mac mini to allow the client to connect to it.
We found that Jump Desktop offers the best quality and ease of use, so we would recommend checking them out first. Of course, different services offer different features. These are some of the available options:
- Jump Desktop is one of the simplest way to connect, and it even supports audio passthrough. We made a tutorial on how to connect here.
- NoMachine offers remote login services free of charge. Check out our tutorial on how to connect.
- Google Chrome Remote Desktop is another free way of connecting to your Mac using the Chrome browser. If you already have a Google account, getting started with it is quite easy and you will be able to access your Mac right from your account through the browser.
- TeamViewer is the best known provider for remote desktop access and is especially easy to use. The downside is, that it's only free to use for personal users.
- If you want to use your Mac from your Tablet, consider giving Parallels Access a go.
- Duet also supports macOS, Windows, iOS and Android as client systems.
Please note that we can't provide support for solutions from third parties. We will however help you to get one of the above solutions set up, if you need any help.
3. Access via Screen Sharing
The easiest way to connect to a Mac is to use the Screen Sharing service present on macOS. We have enabled this service by default for your convenience so you can take advantage of it right away. Under the hood, Screen Sharing uses the VNC protocol with some added features like username/password authentication and encryption.
Connect using macOS
For macOS users, all you have to do is press on the Open Screen Sharing button located under Access in your
Customer Panel after selecting the server you want to connect to. The connection via
Screen Sharing is fully encrypted.
Connect using Windows or Linux
Unfortunately, Windows doesn't come with a secure option to connect to VNC out of the box. For an encrypted connection,
we recommend you to use the following clients to connect to Screen Sharing. You can find your login credentials
in the Customer Panel on your servers page under the Access tab.
- RealVNC Viewer - This client supports the macOS authentication mechanism. The paid version also supports an encrypted connection to your Mac.
- Remotix - A powerful client enabling you to securely connect to your Mac. They require a one-time purchase but come with a free 14 day trail.
The default VNC protocol isn't really made for speed or performance. We recommend checking out third party services for remote access if you're looking for free alternatives. For this, check out the listing above.
4. SSH Access
For use-cases in which you only need access to your Mac through the command line, SSH access comes in handy.
By default, the SSH server is enabled on your Mac mini and can be accessed through any SSH client on port 22.
We recommend to change the connection via SSH to Public-Private-Key-Authentication to increase the security of your system.
Can I disable SSH access?
To do this, go to System Settings -> Sharing -> Remote Login and turn SSH access on or off as desired.
VNC Access for Nerds
If you want to use a different VNC client that doesn't support Apples auth implementation, enabling the password
authentication is required. You can do this by navigating to System Settings -> Sharing -> Screen Sharing on
the device and clicking on Computer Settings....
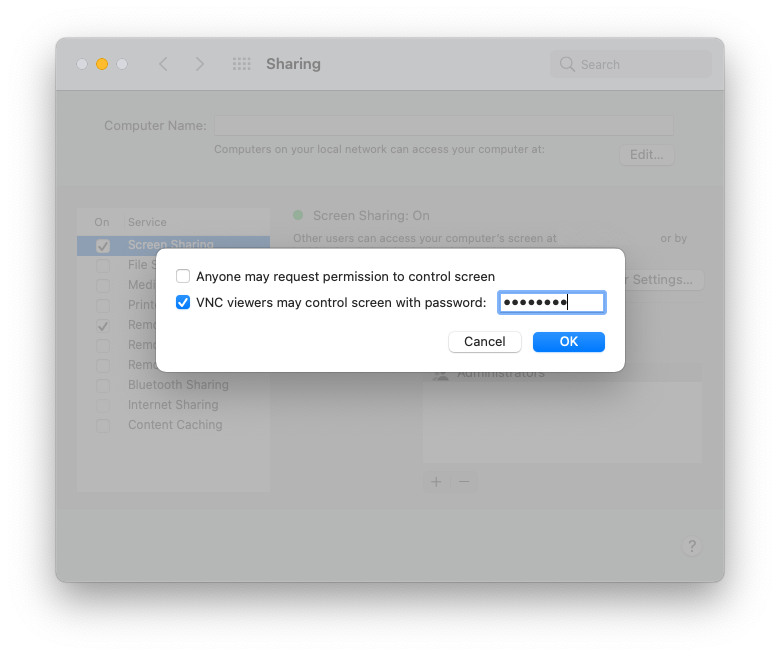
Enabling this option will allow your client to connect through an unencrypted connection.
To avoid unencrypted access, consider forwarding the VNC port via SSH by opening a tunnel. Don't forget to deny access to the VNC port through the firewall.
ssh -L 5900:localhost:5900 [ip-of-your-mac]
Troubleshooting
The login password does not seem to work
When connecting via Screen Sharing/VNC
If you changed the username or password of the macOS after the initial setup (for example using the System Settings), the initial login credentials displayed in the Customer Panel will not work anymore. Please use your new credentials to log in.
When connecting via Web KVM
Make sure that the correct keyboard layout is selected, as some keys differ depending on the layout. By default, the
U.S. keyboard layout is selected. You can change this on the login screen by clicking U.S. or ABC in the upper right corner.
![]()
I want to change the resolution of the display
To change the resolution, navigate to System Settings -> Displays and hold down the option key on the keyboard
while pressing on Scaled. This will bring up all supported resolutions.
How do I enable/disable Screen Sharing on Mac mini?
To enable screen sharing on your Mac mini, go to System Settings -> Sharing -> Screen Sharing and enable/disable
the service. Screen sharing is enabled by default.
I cannot access the Screen Sharing Service. What is the reason?
- Check whether your firewall is active and that access to the ports for Screen Sharing is allowed. Otherwise, the connection may be blocked.
- If you disabled the
Screen SharingService or enabledRemote Managementin the System Preferences, a remote login will not be possible. To enable it again by going toSystem Settings -> Sharingand enable theScreen Sharingservice. Make sure theRemote Managementoption is disabled. - If your Mac stops responding or is in boot mode, the Screen Sharing Service is not active. In this case, use the KVM module via the customer panel and try issuing a force reboot.
Why does it say "Your screen is being observed"?
The "Your screen is being observed" message is shown by macOS when Screen Sharing or remote access is active.
It does not mean your screen is being watched without your knowledge. It simply indicates that you are currently connected to the Mac using Screen Sharing. In other words, you are the one observing and controlling the screen.
Once you disconnect from Screen Sharing, the message disappears immediately.
Your Mac is not monitored by us, and will only ever be accessed by authorized support staff after you grant explicit permission, for example to assist you in a support case.
You can read more about this message on Apple's official support page